
- What is a Stripe API key?
- Step-by-step instructions
Connecting Stripe to Billed lets your clients pay invoices with a credit or debit card directly from the invoice page. To set up the integration you need your Stripe Secret API Key—the credential Stripe uses to confirm your account when a hosted app like Billed creates charges on your behalf. This guide shows you exactly where to find your Stripe API key, how to connect it, and how to keep it secure.
Key Takeaways
- Follow a clear, step-by-step process for get my Stripe API key that reduces errors
- Key steps include what is a stripe api key?, step-by-step instructions and other practical actions
- Avoid the most common mistakes people make with get my Stripe API key
What is a Stripe API key?
Stripe uses API keys to authenticate requests between your account and third-party applications like Billed. There are two types:
- Publishable key (starts with
pk_live_) — Used on the client side to identify your account. This key is safe to expose in front-end code. - Secret key (starts with
sk_live_) — Used on the server side to process payments. This key must be kept private. Billed needs the secret key to charge your clients on your behalf.
Step-by-step instructions
- Log in to your Stripe account at dashboard.stripe.com.
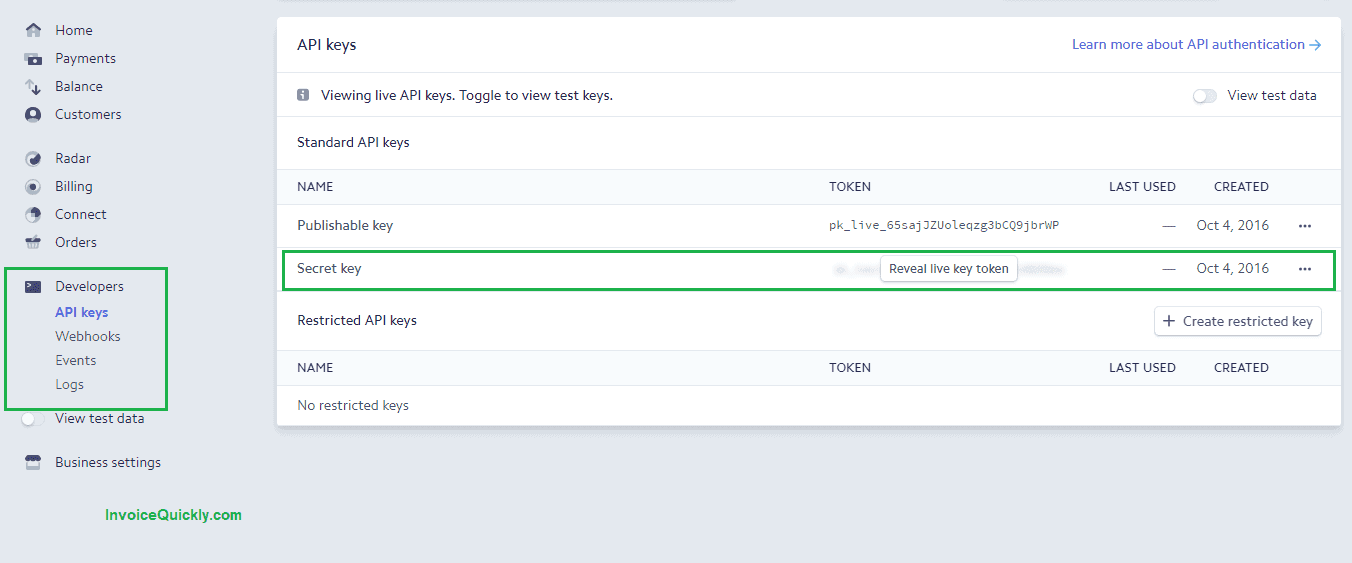
- In the left sidebar, click Developers.
- Click API Keys.
- Next to Secret key, click Reveal live key token.
- Copy the key — it starts with
sk_live_. - In Billed, go to Settings > Payment Gateways > Stripe and paste the key.
- Click Save to activate the connection.

Once connected, every invoice you send will include a Pay Now button that lets clients pay with Visa, Mastercard, American Express, and other cards Stripe supports. Payments are deposited directly into your linked bank account on Stripe's standard payout schedule.
Test mode vs. live mode
Stripe provides two sets of API keys: test and live. Test keys (prefixed sk_test_) let you simulate payments without moving real money. This is useful for verifying the connection before you start billing real clients.
To switch between modes, use the Test mode toggle at the top of your Stripe Dashboard. When testing is complete, switch back to live mode and make sure you have entered the live secret key in Billed.
Keeping your key secure
Your secret key grants full access to your Stripe account's payment processing. Follow these precautions:
- Never share it publicly. Do not post it in forums, emails, or chat messages.
- Do not commit it to a code repository. If you use Stripe in custom integrations, store the key in environment variables.
- Restrict access. Only account owners and administrators should be able to view API keys in Stripe.
- Roll the key if compromised. If you suspect your key has been exposed, click Roll key in the Stripe Dashboard to generate a new one. Update the new key in Billed immediately — the old key stops working after a short grace period.
- Use restricted keys for custom builds only. If you develop your own integration, Stripe allows restricted keys with fine-grained permissions. For Billed, use the standard secret key from Developers → API keys unless support directs you otherwise.
- Watch for phishing. Stripe will not email you asking for your secret key. Paste keys only into trusted settings screens inside Billed or Stripe—not into random “verification” forms.
Team hygiene
Limit who can view or roll keys in Stripe to owners and billing admins. When someone leaves the organization, remove their Stripe user access the same day you revoke other systems. If you use a password manager, store a note of when the live key was last rotated so incident response is faster.
Webhooks and advanced Stripe setup (what the API key unlocks)
Your Stripe API key is the main credential for server-side actions, but many advanced flows also use webhooks—HTTPS callbacks Stripe sends when events happen (payment_intent.succeeded, charge.refunded, and so on). In custom software, you configure webhook endpoints under Developers → Webhooks and verify signatures with a webhook signing secret (different from the API key).
If you use Billed’s native Stripe connection, you typically do not need to configure webhooks yourself; Billed handles the payment flow against your account using the secret key you provide. You might still visit the webhook section when debugging a custom site checkout or a Zapier integration that runs alongside invoicing. Understanding the split helps: API keys initiate actions; webhooks notify your systems about asynchronous results.
Troubleshooting common issues
- "Invalid API Key" error in Billed — Make sure you copied the Secret key, not the Publishable key. The secret key starts with
sk_live_. - Payments not appearing — Confirm you are using your live key, not a test key. Test transactions only show in Stripe's test mode and do not process real money.
- Key not visible in Stripe — You may need account owner permissions to view or reveal API keys. Ask your account administrator if the option is greyed out.
- Payments failing after key roll — If you recently rolled your key, make sure you updated the new key in Billed under Settings > Payment Gateways > Stripe.
- Account not fully activated — Stripe may require business details or identity verification before live charges succeed. Check the Dashboard home page for banners blocking payouts or charges.
- Currency or country mismatch — If your Stripe account is set up for one country but you invoice in unsupported combinations, payments can fail with generic errors; confirm your default currency and allowed card currencies in Stripe settings.
- Browser extensions blocking checkout — Ad blockers occasionally interfere with embedded payment fields; ask the payer to try another browser or disable extensions for the invoice page.
If problems persist, copy the error code from the Stripe Dashboard Payments or Logs section—those IDs make support tickets much faster to resolve.
Why accept card payments on invoices?
Offering card payments removes friction for your clients. Instead of writing a check or setting up a bank transfer, they click a button and pay in seconds. Businesses that accept online payments on invoices typically get paid faster — often within one to three days instead of the standard 30-day cycle.
Billed also supports PayPal as a payment gateway. You can enable both Stripe and PayPal to give clients the flexibility to choose their preferred payment method. For a bigger-picture view of how card flows fit into your stack, read what are integrated payments.